

Most Haldex units that stop engaging after a service are unprimed or starved of pressure, so check the oil level, confirm the pump was primed on refill, and check fuses and connector power before you buy a single part. If those come back clean, the fault usually sits in the pickup screen, the wiring, or a stalled controller adaptation, and each has its own quick test.
TL;DR:
- Most post-service Haldex engagement issues stem from unprimed pumps, trapped air, or low fluid levels, not mechanical failures.
- Electrical faults like blown fuses, corroded wiring, or damaged connectors are common causes and should be checked before replacing the pump.
- A proper system test involves command-triggered pump operation, resistance measurements, and check of the 12V supply and wiring integrity.
- Running the pump adaptation routine requires a stable battery, cleared codes, and correct procedure to avoid false faults or module disconnection.
- Parts replacement should be based on resistance tests, contamination, or confirmed mechanical damage, not assumptions, prioritizing repairs of seals or screens over full pump replacements.
Table of Contents
- Why is my Haldex not engaging after service?
- Common causes of Haldex engagement failure after service
- How do you test the pump and electrics?
- What does the Haldex pump learn actually do?
- Should you replace the pump or the controller?
- How should you use OBD tools safely during diagnosis?
- Which parts fix these faults after diagnosis?
- What workshops get wrong after a Haldex service
- Get the right Haldex parts for your fix
- Sources
Why is my Haldex not engaging after service?
Get the basics right before you touch a multimeter. Most post-service failures trace back to something simple that got missed during the refit, not a dead pump.
- Check the oil level and priming. A Haldex pump needs to be primed with fluid on refill; air trapped in the system means the pump spins but never builds pressure.
- Inspect fuses and connector power. Pull the relevant fuses and check for 12V at the Haldex connector before assuming the controller has failed.
- Scan for stored fault codes. Plug in and check whether the AWD module still answers on the CAN bus, usually at address 22 or the relevant auxiliary module address, and pull any stored codes.
- Listen during a re-learn attempt. A working pump makes an audible whirr when commanded; silence points to power or motor failure, noise with no pressure points to a blockage.
- Check wiring and connector pins for damage. Corrosion or a pinched wire from the service itself is a common, easily missed cause.
- If the pump runs but engagement still fails, check the filter and screen. A pump straining against a clogged screen behaves exactly like a weak or failing unit.
Pro Tip: Do the oil and fuse checks before you even open a diagnostic tool. Half the “failed pump” complaints after a service turn out to be a low fluid level or a 15A fuse that popped during the refit.
Common causes of Haldex engagement failure after service
A Haldex service touches oil, a filter, and sometimes a pump, so most post-service faults come from one of those three areas rather than a genuinely new mechanical failure.
- Unprimed pump or trapped air. If the unit wasn’t bled or primed correctly during refill, it can’t build the pressure the coupling needs to lock.
- Blocked pickup screen or contaminated oil. This chokes the pump even when the motor itself is healthy, and it’s more common than mileage alone would suggest, with forum reports describing clogged screens after as little as 10,000 miles despite official guidance suggesting roughly three-year service intervals.
- Electrical faults. A blown fuse, a corroded ground, or damaged connector pins disturbed during the service can cut power to the pump or controller entirely.
- Controller adaptation faults. The controller can log an internal system fault, often flagged with codes like 16671 or C111204, and this can persist even after a brand-new pump goes in if the adaptation tables or power supply are still causing trouble.
- Secondary sensor and bus faults. ABS or ESP sensor errors and CAN bus glitches can stop the adaptation routine from ever completing, leaving the system stuck even though the hardware is fine.
That single fact changes the order you should work in: fluid and filter first, electronics second, pump replacement last.
How do you test the pump and electrics?
Testing in the right order saves you from replacing a pump that was never faulty in the first place.
- Command the pump with an OBD tool and listen. Most diagnostic software, including OBDeleven and VCDS, lets you trigger the pump directly. A healthy pump whirrs audibly within a second or two of the command.
- Measure pump motor resistance. Disconnect the pump and check winding resistance with a multimeter. Many fifth-generation pumps sit in the 5 to 8 ohm range when healthy; a reading below roughly 2 ohms usually points to shorted windings, and an open circuit (no reading at all) means a dead motor or broken wire.
- Check 12V feed and earth. Confirm you actually have battery voltage at the connector with the ignition on, then check the ground path. Also check the relevant Haldex-feed fuses, since a blown fuse is one of the most commonly reported causes of a controller that seems to have vanished.
- Inspect the in-line connector under the rear seat. This connector sees moisture and vibration over the car’s life, and corroded or bent pins here will mimic a pump or controller failure convincingly.
- Watch for CAN bus symptoms. If the AWD module has dropped out of the gateway scan entirely, or you’re seeing intermittent bus errors alongside other unrelated warning lights, you’re likely looking at a wiring or gateway issue rather than a pump problem.
Pro Tip: Combine live data with a simple multimeter check rather than trusting one fault code alone. A pump that draws no current when commanded and reads open circuit on resistance is dead; a pump that draws current but produces no pressure is usually just starved of oil or blocked at the screen.
What does the Haldex pump learn actually do?
The controller doesn’t just switch the pump on and off. It measures the current the motor draws during operation and stores those values as a baseline, which is how it distinguishes a healthy pump from a failing one on future checks. That baseline is the “pump learn” or adaptation, and it has to be redone whenever the pump, controller, or related components are disturbed.
- A hung or failed adaptation often shows as a red halt in tools like OBDeleven, or the AWD module disappearing from the gateway scan entirely. This is a well-documented outcome when the relearn is interrupted partway through, rather than evidence of a broken pump.
- Run the sequence in the right order. Clear any unrelated stored DTCs first, make sure the battery is fully charged and voltage is stable (a battery charger connected during the procedure is cheap insurance), then run the adaptation.
- A reboot and fuse check often restores visibility. If the module drops out after a failed attempt, a power cycle, a fuse check, and rechecking CAN communication frequently brings it back without any parts being replaced.
- Adaptation won’t fix a hardware fault. If the pump has no fluid, is mechanically seized, or the wiring is damaged, running the relearn repeatedly just wastes battery charge and time. It’s a calibration step, not a repair.
Should you replace the pump or the controller?
The decision usually comes down to what your tests actually showed, not a hunch about which part “feels” more likely to have failed.
- Pump never runs, and resistance measurements show open or shorted windings. Replace the pump. There’s no repairing a dead motor.
- Pump runs, but pressure never builds, and the screen is dirty. Clean the screen, renew the oil, and retest before spending anything on a new pump.
- Adaptation fails repeatedly, but pump current draw and power supply both check out fine. The controller’s calibration or the unit itself may need attention rather than the pump.
- Wiring shows corrosion or damage at the rear-seat connector. Repair the wiring first. Replacing a pump or controller won’t fix a bad connection.
| Symptom | Most likely cause | Sensible first step |
|---|---|---|
| Pump silent, no current draw | Dead motor or no power | Check fuses and 12V, then test resistance |
| Pump runs, no pressure | Blocked screen or low oil | Clean screen, renew fluid, retest |
| Adaptation fails, power and pump test fine | Controller fault | Investigate controller before replacing pump |
| Module missing from gateway | Interrupted relearn or blown fuse | Power cycle, check fuses, recheck CAN |
Working through this order, cheapest and most reversible checks first, is how most workshops avoid selling a customer a pump they didn’t actually need.
How should you use OBD tools safely during diagnosis?
Get the sequence wrong and you can turn a simple fault into a genuinely confusing one, mostly by interrupting an adaptation at the wrong moment.
- Confirm battery health first. A weak or fluctuating battery is a common, avoidable cause of a corrupted relearn; put it on a charger if there’s any doubt.
- Clear unrelated DTCs before you start. Codes from other systems can distract from the actual fault and occasionally interfere with the adaptation routine itself.
- Watch live data during the pump command. Pump current draw, requested torque, and pressure (where the tool exposes it) tell you far more together than any single fault code will on its own.
- Know the gateway auto-store pitfall. If an adaptation gets interrupted, some gateways store a partial or corrupted result automatically, which is exactly what causes a module to vanish from later scans.
- Know when to stop. Intermittent CAN bus errors, wiring faults inside the loom, or a controller that needs recalibration rather than replacement are jobs for a specialist with the right diagnostic depth.
Pro Tip: If the AWD module disappears from your gateway scan mid-relearn, don’t panic and don’t keep retrying. Power cycle the car, recheck your fuses, and rescan before attempting the adaptation again.
Which parts fix these faults after diagnosis?
Once you know whether you’re dealing with contamination, a dead pump, or worn seals, matching the part to the fault (and to the correct Haldex generation) is what actually gets the system engaging again.
- Contaminated screen or old fluid on a fifth-generation system: a full service kit with filter and oil resolves it without touching the pump.
- Worn seals causing internal leakage on fifth-generation pumps: the seal repair kit is the sensible fix rather than a full pump swap.
- Dead motor confirmed by resistance testing: a complete pump, filter, and oil kit matched to your generation and OEM reference number is the direct route back to a working system.
- Worn nose section on first or second-generation pumps: replacing just the nose can solve the leak or wear point without the cost of a full pump.
Always match by Haldex generation and OEM reference number before ordering. Fitment between generations looks similar at a glance but the internals, and the pressures they’re rated for, differ enough to matter.
What workshops get wrong after a Haldex service
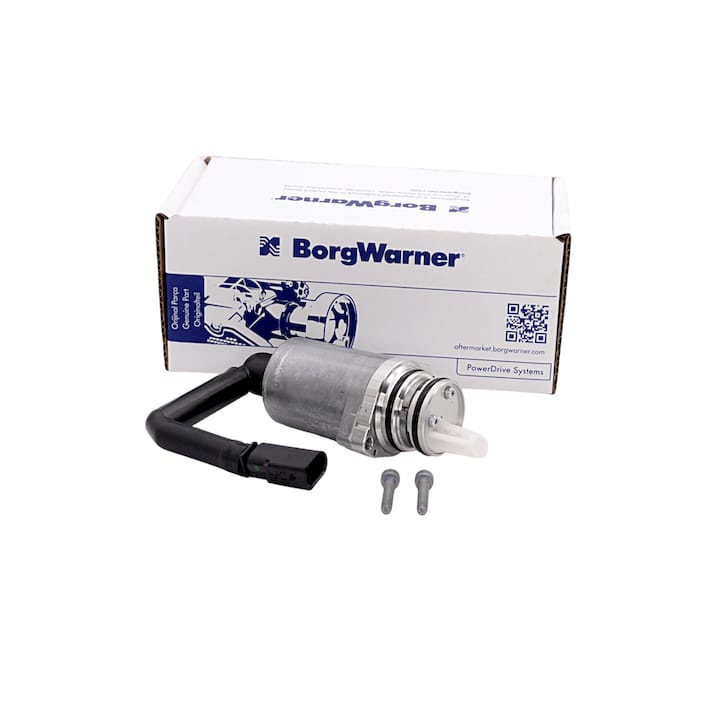
The recurring pattern in most engagement failures after a service isn’t a bad part. It’s a rushed refill that skipped priming, or an adaptation that got interrupted halfway through because someone unplugged the tool too early. Screens that should have been inspected during the service get left in place because the fault “must be the new pump”, when it was contaminated fluid all along.
Order parts by generation and OEM reference, not by guesswork, and check fitment against your chassis code before fitting anything. That single habit prevents most of the return requests we see, and it’s far cheaper than a second removal and refit.
— Mindaugas
Get the right Haldex parts for your fix
Once you’ve worked through the checks above and know whether you’re dealing with contamination, a dead motor, or worn seals, Haldexparts gets you the exact OEM-grade part for your Haldex generation rather than a generic aftermarket guess. Every product is listed by generation and OEM reference number, so you can match your diagnosis to the correct pump, filter, or oil kit without second-guessing fitment.
Browse the service kits collection for filters and oil by generation, or go straight to a complete pump, filter and oil kit if your testing points to a dead motor. Orders over £150 ship free, and every listing includes the OEM reference so you can double-check fitment before you buy. If your diagnosis points to a worn pump nose rather than a full replacement, the nose replacement option is worth checking first.
Sources
For deeper procedural detail beyond what’s covered here, these resources go further into specific diagnostic scenarios:
- VW, Audi, Skoda, Seat: 5th-Generation Haldex 6 Details and Common Faults - Haldex Service
- Haldex service and re-learn gone wrong | OBDeleven