

Replace the Haldex pump only when diagnostics confirm motor or pressure failure, not simply because AWD feels lazy. Most intermittent AWD faults trace back to a clogged filter or dirty fluid rather than a dead pump. Run the checks below first, then order either an OEM repair kit or a full pump such as one of Haldexparts’ generation-specific kits.
TL;DR:
- Replacing the Haldex pump is necessary only when diagnostics confirm motor failure or pressure issues, not for intermittent AWD faults caused by dirty filters or fluid.
- A rebuild kit with seals and filters typically restores function at a lower cost and is preferable before considering full pump replacement.
- Proper parts, tools, and preparation are crucial, including ordering the correct generation-specific kit, fresh oil, fasteners, and marking flange orientation before removal.
- Refill and bleed procedures involve filling through a designated plug, cycling the pump, and topping off slightly over capacity, with faults cleared by power cycling the vehicle.
- A bench test by applying 12V to the pump confirms motor health, and OEM parts are recommended for longevity, especially on higher-mileage units.
Table of Contents
- Repair kit, rebuild, or full haldex pump replacement?
- What parts and kits do you need before you start?
- How do you replace a Gen 4 or Gen 5 Haldex pump?
- How do you refill, bleed, and reset the system?
- How do you know the pump is actually faulty?
- What tools and precautions do you need?
- What does HaldexParts bring to this job?
- Where to buy the right Haldex pump or kit
- Where to check torque specs and fitment details
- Sources
Repair kit, rebuild, or full haldex pump replacement?
A seal and filter kit solves the job when the motor still spins and the pressure sensor reads within range, but oil has gone dark or the filter screen is choked. That covers a surprising number of “AWD light on” complaints. A repair-kit rebuild with fresh seals, filter and brushes often restores full clamping force for a fraction of what a new pump costs, and it’s the sensible first move on any car with unknown service history.
Full replacement becomes the only sensible option when you see:
- A grinding, whining, or silent motor when powered directly
- Haldex/DEM fault codes pointing to pressure or motor circuit failure
- No build-up of pressure even with a clean filter and fresh oil
- Visible wear or scoring inside the pump housing on strip-down
Cost versus longevity is straightforward: a rebuild kit buys you months if the pump housing is already worn, while a new OEM-grade pump tends to outlast several aftermarket rebuilds, particularly on higher-mileage Gen 4 and Gen 5 units.
What parts and kits do you need before you start?
Order everything before the car goes on the ramp. You need the pump (or repair kit), the filter, the flap/flange seal, correct-spec Haldex oil, and new fasteners if the originals look corroded.
- Pump or repair kit: motor and pressure unit, or seals/filter/brushes only
- Filter: almost always replaced alongside the pump regardless of generation
- Flange seal and flap seal: cheap insurance against a weeping housing
- Haldex-specific oil: don’t substitute generic ATF
- Fasteners: Allen bolts and the flange nut, if reused metal has fatigued
Haldexparts stocks generation-matched kits including the AWD pump nose replacement kit for 1st and 2nd generation units, the 5th generation Audi R8 oil pump and the BorgWarner 4th generation pump for Land Rover and Range Rover Evoque.
Haldex pump replacement cost snapshot: aftermarket BorgWarner units for VAG platforms list from around US$168 parts only, while DIY labour typically runs 3 to 4 hours for a competent home mechanic. A workshop quote usually adds several hundred dollars in labour on top of parts.
Cheap aftermarket pumps have a track record of failing within months on forums that track long-term reliability, which is why OEM-grade parts win out even at a higher upfront price.
How do you replace a Gen 4 or Gen 5 Haldex pump?
Both generations follow the same broad sequence, with the pump orientation and connector routing the main differences.
- Prepare the car. Lift on proper jack stands, chock the wheels, and disconnect the battery before touching any electrical connector. Have a drain tray ready; some fluid will spill regardless of how carefully you work.
- Mark and remove the propshaft flange. Scribe the flange orientation before disturbing it. The flange nut is typically 24mm, torqued to around 150 Nm on many applications, so a breaker bar or impact tool is essential.
- Access the pump. Remove the Allen bolts securing the pump housing, unplug the electrical connector, and lift the unit clear while catching residual oil.
- Swap filter and seals. Fit the new filter, flange seal and flap seal before mounting the replacement pump or rebuilt unit.
- Reinstall in reverse. Torque the housing bolts to the manufacturer’s specification, reconnect the electrical plug, and refit the propshaft flange using your scribed marks, torquing the nut accordingly.
Gen 5 units (as fitted to some Audi R8 and later Volvo models) run higher internal pressure, so double-check the factory fitment code or chassis number before ordering, since Haldex 5 pumps aren’t universally interchangeable across model years.
Pro Tip: Photograph the connector routing and flange orientation before you disturb anything. It costs thirty seconds and saves you guessing an hour later when everything looks identical.
How do you refill, bleed, and reset the system?
- Fill through the designated plug using a short length of hose and a small syringe (20 to 60ml), pushing oil in until it runs clear and spill-free at the hole.
- Run the pump briefly with the connector attached to seat the internal clutch pack and circulate fresh oil.
- Remove roughly 60 to 100ml after spill before torquing the fill plug to the specified value, since Haldex units are typically filled slightly over capacity then bled back.
- Power-cycle the vehicle (ignition off, wait, then restart) to clear stored faults; a full scan-tool reset or dealer visit is only needed if DEM codes persist after the cycle.
Haldex 5 pumps operate at pressures up to around 80 bar, which is why manufacturers recommend a fluid service roughly every 50,000 miles rather than waiting for symptoms to appear.
How do you know the pump is actually faulty?
Before buying anything, work through a short checklist:
- Loss of AWD engagement, or front wheels spinning freely on loose surfaces
- Haldex or DEM fault codes stored in the module
- Clunking or delayed engagement when pulling away from a stop
- A filter that comes out black, gritty, or smelling burnt
A quick bench test settles the motor question: apply 12V directly to the pump’s electrical pigtail off the car and listen for a healthy whirr. Silence or a grinding note means the motor has failed. If the motor sounds fine but the filter is heavily contaminated, you’re almost certainly looking at a service issue, not a pump replacement. Reserve a scan tool for confirming stored pressure or circuit fault codes if the bench test is inconclusive.
What tools and precautions do you need?
- Jack stands rated for the vehicle’s weight, plus wheel chocks
- Torque wrench capable of at least 150 Nm, breaker bar, Allen key set
- 24mm socket for the flange nut, drain tray, syringe and hose for refilling
- Nitrile gloves and a sealed container for used Haldex oil disposal
Disconnect the battery before working near the pump’s electrical connector, and consider postal module services for your repair like Airbag Reset UK before working under a car supported only by a jack.
Pro Tip: Reusing a stretched flange nut is the single most common mistake reported in DIY threads. Buy a new one; it costs a few dollars and prevents a loose propshaft connection down the line.
What does HaldexParts bring to this job?
Haldexparts stocks OEM-grade pumps, filters, oils and seals matched to specific Haldex generations, which removes the guesswork of cross-referencing part numbers from a workshop manual. Buying a packaged kit rather than sourcing seals and fasteners separately makes the job noticeably smoother, since everything torques and seats correctly the first time. Getting the fitment right on paper before you touch a spanner matters more than any single step in the removal sequence.
— Mindaugas
Where to buy the right Haldex pump or kit
Once diagnostics point to a pump replacement rather than a service, the parts you order matter as much as the steps you follow. Haldexparts carries three kits worth checking against your VIN before you start: the AWD pump nose replacement kit for 1st and 2nd generation Haldex units for early platforms, the 5th generation Audi R8 oil pump for later high-pressure systems, and the BorgWarner 4th generation pump for Land Rover and Range Rover Evoque for Freelander 2 and Evoque owners specifically.
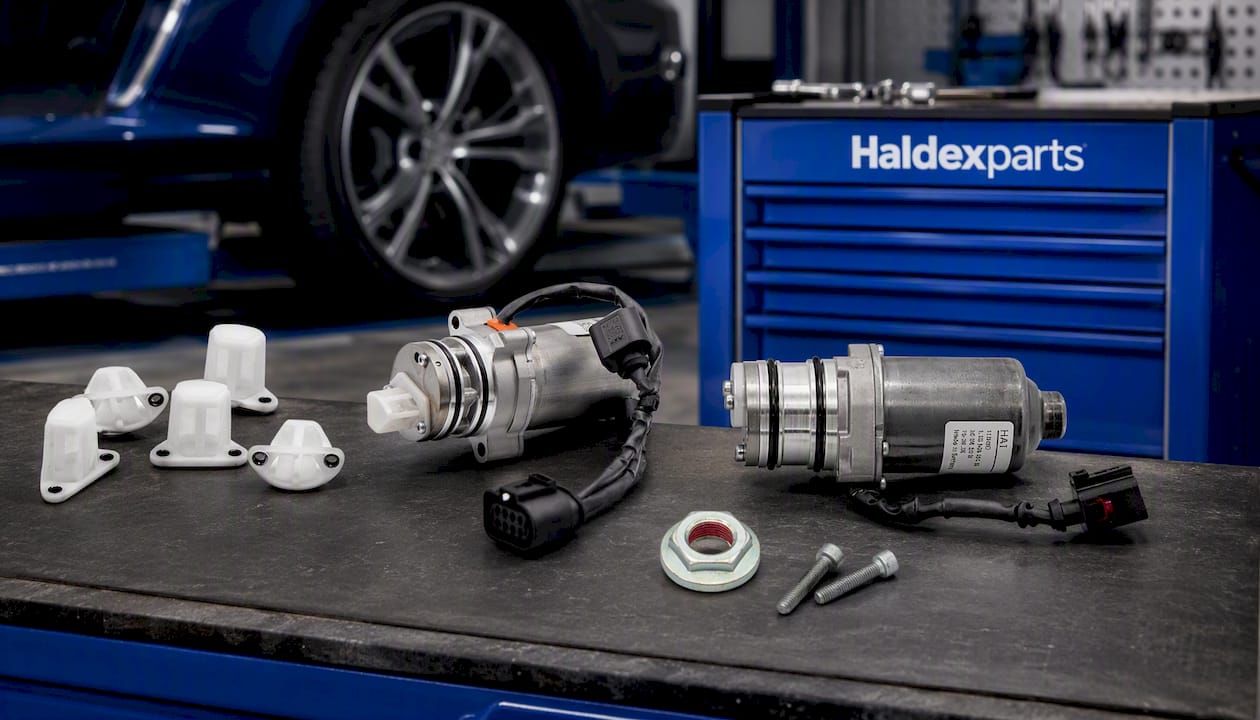
Every kit ships with the correct fasteners and seals included, so you’re not left hunting for a flange seal the night before the job. Orders over £150 qualify for free shipping, which typically covers a full pump kit on its own. Check your chassis number or VIN against the product fitment notes before ordering, then get the parts on your bench before you lift the car.
Where to check torque specs and fitment details
For deeper technical detail beyond this guide, the Matthews Volvo Site forum thread covers flange torque and refill technique step by step. Cross-check part numbers on Haldexparts’ Gen 4 and Gen 5 repair guide or the VW Group fitment guide before ordering.
Sources
- Haldex Oil Pump Replacement - Matthews Volvo Site
- Audi VW Haldex Pump - Borg Warner 0AY598549A
- 2020 Volvo V90 T6 XC - Haldex 5 AOC Pump Kit - Genuine Volvo 31367750 - IPD USA