

A competent DIY mechanic can service a Haldex Gen 3 coupling in roughly two to four hours using an OEM-style Gen 3 service kit containing fresh oil, a cartridge filter, and replacement seals. That timeframe assumes the pre-charge pump and electronic control unit are working properly. If either is faulty, budget extra time and expect to spend more on parts.
Before you touch a spanner, here’s the minimum kit you need on the bench:
- Gen 3-specific oil (correct viscosity and volume for your vehicle)
- Cartridge filter matched to your Haldex generation and model
- Sealing washers and O-rings (never reuse the old ones)
- Pre-charge pump (only if diagnostics point to pump failure)
Skill level required sits at “confident DIYer” rather than “first-time spanner”. You’ll need basic hand tools, a torque wrench, and the patience to work carefully around a driveshaft that’s under tension. Before you start, secure the vehicle on proper axle stands, chock the wheels, and isolate the battery. Never work underneath a car supported only by a jack, and keep the driveshaft controlled once it’s disconnected. It can drop or spin unexpectedly if it is still loosely connected to the differential.
Key Takeaways
A correctly matched OEM-style Gen 3 kit, fitted with attention to torque values and filler-hole overflow level, is the single biggest factor in a service that lasts.
| Point | Details |
|---|---|
| Confirm fitment by VIN first | Cross-reference your VIN and existing part numbers before ordering oil, filter, or pump. |
| No drain plug on Gen 3 | Expect to loosen or separate the unit from the differential to drain old oil fully. |
| Filler hole doubles as level gauge | Refill slowly until oil overflows the filler hole, that’s your correct fill level. |
| Never skip the filter when replacing a pump | A clogged filter is a leading cause of premature pump failure. |
| Dispose of oil responsibly | Take used fluid and filters to an authorised waste-oil recycling point, never a household drain. |
| Haldexparts offers matched Gen 3 kits | Its service kit collection bundles oil, filter, and seals by brand and generation to reduce fitment errors. |
Table of Contents
- What is a Haldex Gen 3 service and why does it differ from other generations?
- Before you start: parts, fluids, tools and safety checklist
- How do you service a Haldex Gen 3 step by step?
- Which oil, filter and seals fit your Gen 3 unit?
- What are the warning signs of a failing Haldex Gen 3 system?
- How much does a Haldex Gen 3 service cost?
- Safety and disposal: doing the job responsibly
- Why does flushing the Haldex oil actually matter?
- A technician’s honest take on servicing Gen 3 yourself
- Where to buy a Gen 3 service kit that actually fits
- Frequently asked questions
- Sources
What is a Haldex Gen 3 service and why does it differ from other generations?
A Haldex Gen 3 service means draining the hydraulic oil that operates the multi-plate clutch pack, replacing the cartridge filter, and refilling with fresh fluid to the correct level, usually alongside inspection or replacement of the pre-charge pump. The key difference from later generations is mechanical: Gen 3 units typically have no dedicated drain plug, so the standard procedure involves loosening or removing the unit from the differential housing to drain the old fluid, then using the filler hole itself as the level gauge once refilled.
This generation was fitted widely across early-to-mid 2000s Audi, Volkswagen, Ford, Volvo, and Land Rover platforms with Haldex-based AWD systems. If you’re used to servicing a Gen 4 or Gen 5 unit with a conventional drain plug, the Gen 3 procedure will feel like a step backwards in convenience. It isn’t difficult, just different, and the lack of a drain plug is the single detail that catches out most first-timers.
Haldex brake service and general driveline maintenance share some crossover in tools and safety practice, but the clutch-pack oil system in a Gen 3 coupling is a separate hydraulic circuit from the vehicle’s brakes as explained in How AWD uses your brakes: what owners need to know. Don’t confuse the two when sourcing fluid.
Before you start: parts, fluids, tools and safety checklist
Get everything laid out before you jack the car up. Nothing kills momentum on a Saturday morning job faster than realising halfway through that you’re missing a seal or the right socket size.
Your full parts list should include:
- Gen 3-specific Haldex oil in the correct volume for your model
- A new cartridge filter matched by part number to your unit
- Replacement O-rings and gaskets for the housing
- New sealing washers for any banjo bolts or drain points
- A pre-strainer, if you’re also replacing the pump
| Tool | Purpose |
|---|---|
| Torque wrench (Nm range for driveline bolts) | Correct reassembly torque on housing and driveshaft bolts |
| Axle stands | Safe vehicle support, never rely on a jack alone |
| Allen key set (metric) | Housing bolts on most Gen 3 units |
| Socket set with deep sockets | Driveshaft flange and pump mounting bolts |
| Fluid filler pump or syringe | Filling through the narrow filler hole |
| Absorbent tray and rags | Catching drained oil and preventing spills |
| Multimeter | Testing pump resistance if diagnosing a fault |
Pro Tip: Before you order anything, note your VIN and cross-reference the filter and pump part numbers against your specific model year. Haldex units were revised mid-production on several platforms, and a filter that fits a 2004 model won’t always fit a 2007 one from the same badge.
Run through this safety checklist before lifting the car: confirm your axle stand points match the manufacturer’s specified lift locations, chock the wheels that stay on the ground, disconnect the battery negative terminal before working near the pump’s electrical connector, and have a sealed container ready for the used oil. Never let the driveshaft hang unsupported once disconnected. Haldex units are heavier than they look, and a dropped coupling can cause real injury.
How do you service a Haldex Gen 3 step by step?
Servicing a Gen 3 Haldex follows a fixed sequence: secure the vehicle, remove the driveshaft, drain the old oil by tilting or partially removing the unit, swap the filter, refill via the filler hole until it overflows, then test. Here’s the full walkthrough.
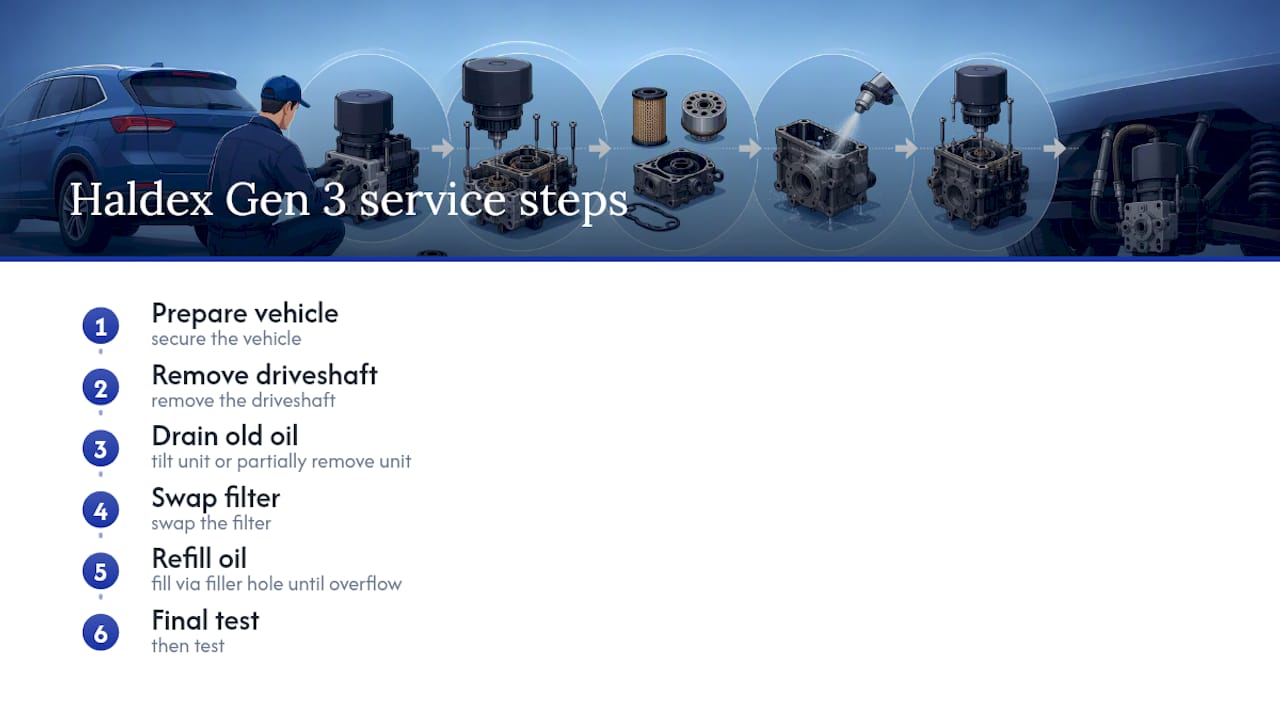
1. Prepare the vehicle
Raise the rear of the car on axle stands rated for the vehicle’s weight, chock the front wheels, and disconnect the battery. Photograph the driveshaft flange and its bolt positions before you touch anything. This sounds unnecessary until you’re staring at a flange with no memory of which way it indexed.
2. Remove the rear driveshaft or propshaft
Mark the driveshaft’s orientation relative to the differential flange with a paint pen or scratch mark. Undo the flange bolts, working in a star pattern to release tension evenly. On older vehicles, corrosion can seize these bolts solid.
Pro Tip: If a bolt won’t budge, resist the urge to force it with a breaker bar straight away. Community write-ups from Gen 3 owners describe soaking seized bolts in penetrating oil overnight and using a chisel tapped against the bolt head to shock it loose before applying torque. It works more often than brute force alone.
3. Support and remove the driveshaft
Once the flange bolts are out, support the driveshaft (it’s heavier than it looks) and slide it clear. Set it somewhere safe where it won’t roll or fall.
4. Access the Haldex unit and drain the oil
This is where Gen 3 diverges from later generations. Most Gen 3 couplings have no drain plug, so the accepted method is to loosen the mounting bolts holding the unit to the differential housing, tilt it, and let the old oil drain into your tray. Some installations require fully separating the unit for proper drainage. A detailed Gen 3 write-up from the Volvo owner community documents this exact approach on P2-platform XC90s, and reports a total refill volume typical for that installation once the job is complete.
While the oil drains, inspect it. Fresh Haldex oil should look clean and amber. If you see metallic glitter or dark clutch material suspended in the fluid, that’s wear debris from the clutch pack, and it’s a strong signal the filter has been overdue for replacement for some time.
5. Remove and replace the cartridge filter
Locate the filter housing (position varies by model, but it’s usually on the side or underside of the unit). Remove the old cartridge filter and inspect the pre-strainer if your unit has one accessible. A clogged pre-strainer restricts oil flow to the pump and is a common, overlooked cause of premature pump failure. Fit the new cartridge filter and, if you’re replacing the pre-strainer too, do it now while access is easy.
6. Inspect the pre-charge pump
If you’re not planning to replace the pump, still take the opportunity to check its electrical connector for corrosion and test its resistance with a multimeter against the manufacturer’s expected range for your model. Technical troubleshooting guidance developed for Generation 4 units recommends this same resistance test as a reliable first check, and the underlying pump technology carries across generations closely enough that the method applies to Gen 3 units too.
If the pump shows an open circuit, wildly out-of-range resistance, or visible wear on the connector pins, replace it now while everything is already apart. Trying to save money by leaving a marginal pump in place after a full service is a false economy. You’ll likely be back under the car within months.
7. Reassemble the housing
Fit new O-rings and gaskets wherever the housing was separated. Never reuse old seals, even if they look intact. Rubber compresses permanently once torqued down, and a reused seal is a leak waiting to happen. Torque the housing bolts to the manufacturer’s specification. If you don’t have an exact figure for your model, use a moderate, even torque and check for movement rather than over-tightening, which can crack the housing.
8. Refit the driveshaft
Reconnect the driveshaft using your earlier index marks, torque the flange bolts to specification in a star pattern, and double-check nothing is left loose.
9. Refill through the filler hole
With no drain plug, the filler hole doubles as your level gauge. Use a fluid pump or large syringe to inject fresh oil slowly through the filler hole until it begins to overflow. That overflow point is your correct fill level. Wipe away the excess, refit the filler plug, and torque it to a snug, sealed fit without over-tightening the threads.
10. Reconnect the battery and test
Reconnect the battery, start the engine, and take the car for a low-speed test drive that includes a few tight, slow turns in an empty car park. This loads the AWD system in the way most likely to reveal a problem. Listen for unusual noises from the rear differential area and watch the dashboard for any AWD warning light.
Throughout this whole process, keep the vehicle firmly supported, never work with the driveshaft loose and unsecured, and treat every torque figure as important rather than optional. A loose driveshaft bolt at motorway speed is not a small mistake.
Which oil, filter and seals fit your Gen 3 unit?
Getting the parts right matters more than getting the technique perfect. A correctly executed service with the wrong filter part number will fail faster than a slightly rough service done with the right parts.
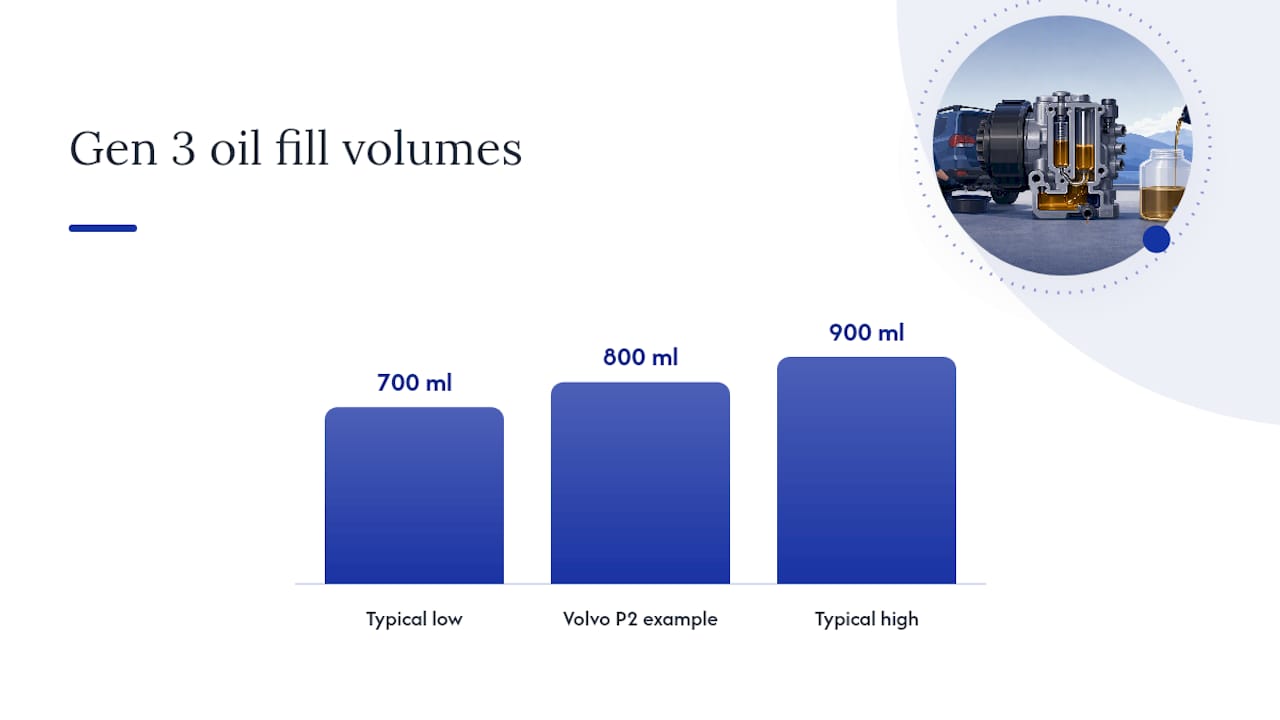
Gen 3 units require a specific Haldex-rated hydraulic oil, not generic gear oil or ATF. The exact fill volume varies by vehicle platform, but expect somewhere in the region of 700 to 900ml depending on the housing design, with the Volvo P2 write-up cited earlier landing around 800ml for that particular application. Always check your specific model rather than assuming a figure from a different platform will match.
A typical OEM-style Gen 3 kit should include:
- Haldex-specification oil, correctly rated for clutch-pack hydraulics rather than general differential use
- Cartridge filter, matched by part number to your generation and model year
- O-rings and housing gaskets, sized for your specific unit
- Sealing washers for the filler plug and any banjo fittings
- Pre-strainer, where accessible and applicable to your unit
Confirming fitment is a three-step process. First, find your VIN, usually on the driver’s door pillar or the vehicle’s registration document. Second, compare any part numbers stamped or labelled on your existing Haldex unit against what you’re about to order. Third, cross-reference both against a supplier’s fitment data before paying for anything. Haldexparts structures its service kit collection around exactly this workflow, letting you filter by brand and generation so you’re not guessing from a parts diagram.
An OEM-style bundled kit, oil, filter, and seals together, reduces risk in a way that buying parts separately doesn’t. It’s far too easy to order the right filter but the wrong seal kit, or to buy oil in the wrong volume and end up short mid-refill. A bundled kit, such as the BorgWarner pump, filter and oil kit built for Volvo 4th generation units, shows how a properly matched set removes that guesswork, even though the specific kit you need will depend on your generation and platform.
Pro Tip: Never reuse an old seal because “it still looks fine,” and never skip the pre-strainer if your unit has one. A clogged pre-strainer starves the pump of clean oil flow, and technical write-ups on Generation 4 pump failures consistently point to this exact chain of failure: dirty filter, restricted flow, overworked pump, premature pump death. Replacing a £20 filter is far cheaper than replacing a pump that failed because of one.
What are the warning signs of a failing Haldex Gen 3 system?
The most common giveaway is an AWD warning light paired with the vehicle behaving oddly on tight, slow turns, a symptom that points to clutch or pump trouble rather than a simple sensor fault. Other symptoms worth knowing:
- Slipping or juddering under acceleration, especially in low-traction conditions, suggests worn clutch plates or contaminated oil.
- A noisy pump (whirring, grinding) during operation often signals worn pump brushes or bearing wear.
- Visible oil leakage around the housing points to a failed seal, frequently from reused seals during a previous service.
- Abnormal drive behaviour on tight turns, sometimes described as a mild “hopping” feel, can indicate the clutch pack isn’t engaging or disengaging smoothly.
Run these quick checks before assuming the worst. Test the pump’s electrical resistance with a multimeter and compare it against your model’s expected range; a reading well outside spec usually confirms a failing pump. Pull the filter and pre-strainer and look for metallic glitter or dark clutch debris; either is a sign the system has been running degraded oil for longer than it should have. If you have access to a diagnostic tool, check for stored fault codes relating to the AWD control module, which can narrow down whether the issue is mechanical or electronic.
Use this rough decision flow once you’ve run the checks:
- If the filter was overdue and the fluid shows debris, replace the filter and oil, then retest before assuming pump failure.
- If the pump reads out of spec electrically, replace the pump alongside the filter, never one without the other.
- If fault codes point to the control module itself rather than the pump or clutch, that’s a job for a workshop with proper diagnostic software.
- If the clutch pack shows internal mechanical failure (metal-on-metal wear, seized plates), the unit likely needs professional rebuild or replacement rather than a DIY service.
A clogged filter causing a slow pump is a straightforward DIY fix. A dead control module or a mechanically destroyed clutch pack is not, and pushing on with DIY methods past that point risks damaging new parts you’ve just fitted.
How much does a Haldex Gen 3 service cost?
A basic Gen 3 service kit, oil, filter, and seals, typically runs from moderate double figures up to around £100 to £150 depending on your vehicle brand and supplier, with prices fluctuating based on availability and whether OEM or OEM-equivalent parts are used. Add a pre-charge pump to that job and total parts costs climb noticeably, since pumps are the most expensive individual component in the system.
DIY labour costs you nothing but time, and most owners comfortable with basic mechanical work finish the job in an afternoon. A professional garage doing the same job, oil, filter, and a visual inspection, typically charges for one to two hours of labour on top of parts, though this varies by region and workshop rates. Complex cases push that higher. A seized driveshaft flange, corroded housing bolts, or a pump that needs diagnostic software to properly confirm before replacement can all add significant time to a job that should otherwise be quick.
Factors that push cost up include:
- A seized or corroded driveshaft requiring penetrating oil, specialist tools, or repeated attempts to free
- Pump replacement, which is the single biggest parts expense in a Gen 3 service
- ECU-level diagnostics, which usually require dealer-level or specialist diagnostic software rather than a basic code reader
- Sourcing genuine OEM parts by VIN when your model uses a less common variant of the unit
Professional service becomes the sensible option once you’re dealing with electrical faults that need proper diagnostic software, a housing that won’t separate cleanly from the differential, or a control module fault rather than a mechanical one. There’s no shame in handing over a job that’s turned into more than a straightforward fluid and filter swap. Knowing when to stop is part of doing the job properly.
Safety and disposal: doing the job responsibly
Used Haldex oil and the components you remove need to be handled correctly, both for your own safety and to avoid environmental harm.
Keep these safety points front of mind throughout the job:
- Support the vehicle only on axle stands rated for its weight, never on a jack alone
- Chock the wheels remaining on the ground before you start
- Isolate the battery before working near the pump’s electrical connector
- Never let the driveshaft rotate or hang unsecured once disconnected
- Wear gloves and eye protection when draining oil, which can carry fine clutch debris
Used Haldex fluid counts as hazardous waste and shouldn’t go down a drain or into general rubbish. Capture the drained oil in a sealed, labelled container along with the old filter, and take both to an authorised waste-oil recycling point. Most councils and auto parts retailers in the United States operate collection points specifically for used motor oil and filters. Local disposal rules vary by municipality, so check your area’s specific guidance for hazardous automotive waste before dropping anything off.
Why does flushing the Haldex oil actually matter?
The oil inside a Gen 3 Haldex unit does two jobs at once: it builds the hydraulic pressure that clamps the multi-plate clutch pack, and it carries away the fine metal and friction material that clutch wear naturally produces. That second function is why the oil can’t just be topped up forever. Every engagement of the clutch sheds a tiny amount of material into the fluid, and over time that builds into a suspension of abrasive particles circulating through the same pump that’s meant to have a long service life.
The filter’s job is to catch that debris before it reaches the pump. Technical breakdowns of Haldex coupling failure describe exactly this mechanism: clutch wear particles contaminate the oil, the filter loads up with debris over time, and a filter that’s never replaced eventually restricts flow enough to overwork and kill the pump. Some suppliers building service kits recommend fluid and filter changes at intervals in the region of 30,000km to 50,000 miles, though the right interval for your vehicle depends on manufacturer guidance and how the car is driven.
When you drain the old oil during a service, look closely at what comes out. Fine, glittery metallic particles or dark, gritty material suspended in the fluid is clutch debris, and its presence is a useful diagnostic in itself. It tells you the system has been running on degraded oil for some time, and it’s a strong argument for replacing the pre-strainer alongside the filter rather than assuming the strainer is still doing its job.
- Fresh, clean oil protects clutch engagement quality and pump longevity
- A clogged filter is one of the most common root causes of premature pump failure
- Debris in drained oil is a diagnostic clue, not just a mess to wipe up
A technician’s honest take on servicing Gen 3 yourself
The step people underestimate isn’t the oil or the filter. It’s freeing a driveshaft flange that’s been sitting untouched for over a decade of road salt and corrosion. Patience with penetrating oil and a controlled chisel tap beats brute force every time, and rushing that step is how bolts snap.
If you’re mechanically confident and methodical, this is a genuinely manageable weekend job. But if you hit a control module fault code or the housing won’t budge without excessive force, that’s the moment to stop and book a workshop. There’s no prize for finishing a job that ends up costing more to fix afterwards.
Where to buy a Gen 3 service kit that actually fits
Ordering a bundled OEM-style kit removes the single biggest risk in this job: mismatched parts. A separately sourced oil, filter, and seal set can leave you halfway through a service with the wrong sealing washer or the wrong fill volume, and that’s a frustrating place to be with a driveshaft already off the car.
Haldexparts builds its Gen 3 service kit range around exact vehicle fitment, letting you select by brand, whether Audi, Volkswagen, Ford, Volvo, or Land Rover, and by Haldex generation, so the oil volume, filter part number, and seal sizes match your unit rather than a generic approximation. If your diagnostics point to the pump rather than just the fluid, the pump collection covers replacement units across those same brands. Before you order anything, confirm your VIN against the part numbers on your existing unit. It’s the single fastest way to avoid a return and a delayed job. Browse the kit range, check compatibility against your vehicle, and get the parts on the way before you start pulling the driveshaft.
Frequently asked questions
How often should a Haldex Gen 3 service be done? Intervals vary by manufacturer, but many suppliers recommend fluid and filter changes somewhere in the range of every 30,000km to 50,000 miles. Check your specific vehicle’s handbook, since some manufacturers specify shorter or longer intervals depending on how the AWD system is used.
Can I service a Haldex Gen 3 without removing the driveshaft? No. The driveshaft has to come off to access the mounting bolts that let you tilt or separate the unit from the differential for draining, since Gen 3 units generally lack a dedicated drain plug.
What happens if I don’t replace the filter during a Haldex Gen 3 fluid change? Old debris trapped in a worn filter continues restricting oil flow to the pump, which shortens pump life and can eventually cause AWD faults or complete pump failure. Filters are inexpensive relative to a pump replacement, so skipping one is a false saving.
Is a Haldex Gen 3 service the same as a Haldex brake service? No. Haldex brake service refers to a separate braking system used mainly on commercial trailers, while the Gen 3 coupling service covered here concerns the AWD clutch pack’s hydraulic oil system. Don’t source parts or fluid intended for one when working on the other.
How do I know if I need a new pump or just a fluid and filter change? Test the pump’s electrical resistance with a multimeter and compare it to your model’s expected range. If the reading is within range and the old fluid shows no significant clutch debris, a straightforward fluid and filter change is usually sufficient.
Where can I check if a Gen 3 service kit fits my specific vehicle? Use your VIN to cross-reference part numbers against your existing Haldex unit, then compare that against a supplier’s fitment listings, such as Haldexparts’ service kit collection, before ordering.
Sources
For readers who want to go deeper into diagnostics, troubleshooting methodology, or real-world repair experiences beyond this guide, these sources cover different angles of the job:
- Guide to generation 4 Haldex trouble shooting — Auto Fault Finder (archive)
- 2006-2008 Volvo P2 XC90 AWD – Gen 3 Haldex/AOC fluid and filter change write-up/guide | SwedeSpeed